How’d you do that?
I’d like to give a walkthrough on how I created the visual you see below. It took some pretty serious tinkering, but it’s not too shabby right?
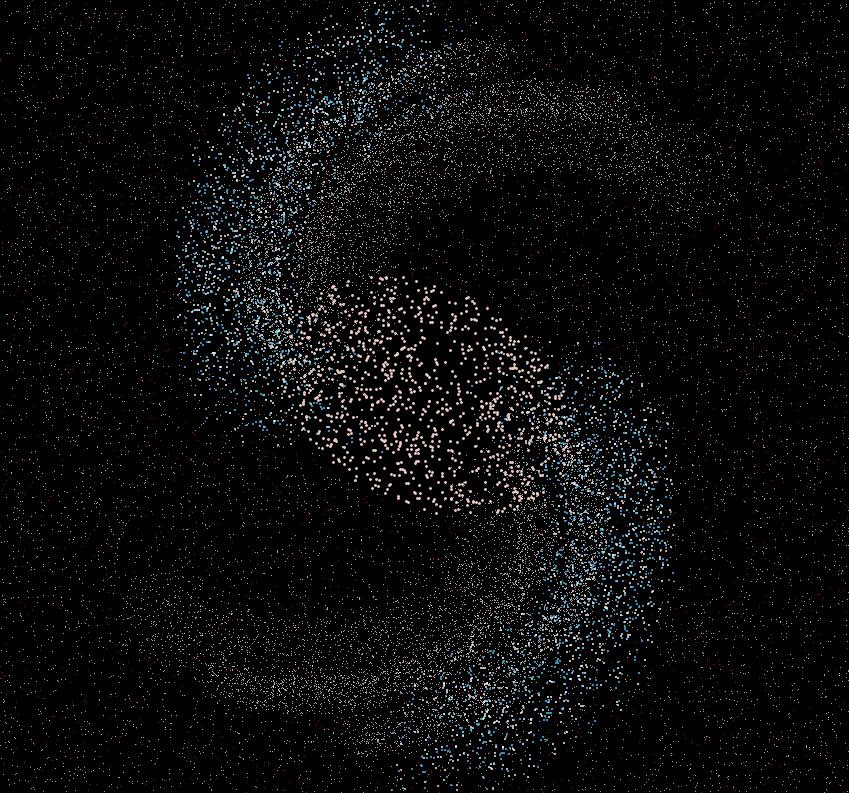
Figure 1: The final output of my galaxy visualization
The secret life of galaxies
I’ve been working on Lee Vaughan’s excellent book Impractical Python Projects, and Chapter 10 really caught my attention since I’ve always marveled at the heavens and its celestial bodies.
Astronomers have traditionally modeled galaxies according to the logarithmic spiral equation given in polar coordinates:
\(\large r = ae^{b\theta}\)
This corresponds to galaxies IRL that look like Figure 2:
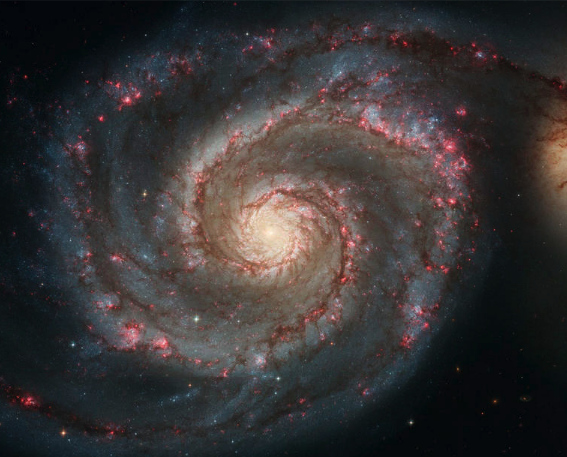
Figure 2: The Messier 51 Galaxy. Source: NASA
This is how Vaughan models the Milky Way in Tkinter. One of the challenge projects at the end of the chapter involves implementing a “barred-shape” construction of galaxies according to the equation suggested by Harry I. Ringermacher and Lawrence R. Mead in their paper A New Formula Describing the Scaffold Structure of Spiral Galaxies (Ringermacher and Mead, 2009):
\(\large r = \frac{A}{ln[B*tan(\phi /2N)]}\)
\(N\) controls how tightly wound the spirals are around the core (think of how you may wrap your arms when you hug somebody), while \(B\) controls the length of the galaxy’s “bar” core. See the paper for more details. This model has the advantage of approximating both the traditional logarithmic spiral and more “barred” shaped spirals, illustrated in Figure 3.
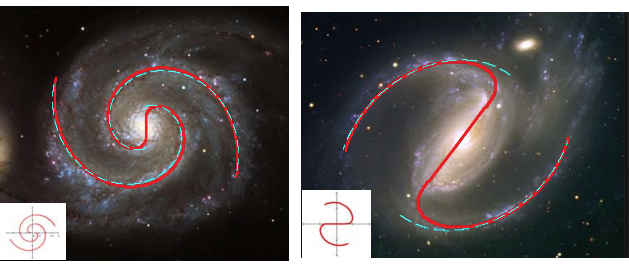
Figure 3: Ringermacher & Mead’s barred-spiral equation used to model traditional (left) and more elongated “bar” shaped spirals (right). Taken from their paper above.
I credit Vaughan for the idea of using a rotation factor and fuzz factor to create elegant spirals. His code for building the Milky Way was a good inspiration for how to approach the challenge project, but significant modification were made (as you would expect for a challenge project!).
Please see his book for more details on galaxy modeling.
Part 1: Preliminary Items
import numpy as np
import math
from random import randint, uniform, random
import tkinter as tk

root = tk.Tk()
root.title("Barred Spiral Galaxy")
c = tk.Canvas(root, width=1000, height=800, bg="black")
c.grid()
c.configure(scrollregion=(-500, -400, 500, 400))
Several libraries are used: numpy to ease some math with arrays, math to get access to trigonometric and log functions, random to generate random numbers and use distributions to add noise to the data, and finally tkinter to actually create and display the visualization. After importing, we set the plotting screen parameters to be large enough to view the final output, and of make the background black to mimic space.
Part 2: Generating coordinates for the galaxy
def random_polar_coordinates(disc_radius_scaled):
    """Generate uniform random x,y point within a disc for 2-D display."""
    ##1##
    r = random()
    ##2##
    theta = uniform(0, 2 * math.pi)
    ##3##
    x = round(math.sqrt(r) * math.cos(theta) * disc_radius_scaled)
    y = round(math.sqrt(r) * math.sin(theta) * disc_radius_scaled)
    return x, y
The function random_polar_coordinates generates points at random to populate a circular 2D disk. These coordinates will be used exclusively to model the surrounding starry sky and the galaxy core, not the spiral arms.
Polar coordinates are well suited as the baseline for creating points since the spiral arms are formed by rotating around the central core of the galaxy at certain angles. These will then be converted to rectangular coordinates for tkinter’s plot window.
This is accomplished by first creating a unit disc (i.e a disk of radius \(1\)) and then scaling it by the disc_radius_scaled parameter to match the tkinter plot window size.
##1## generates a random number between \(0\) and \(1\), and ##2## generates an angle at random between \(0\) and \(2\pi\).
The polar representation for creating points uniformly in a unit disk is \(x = \sqrt{r}cos(\theta)\) and \(y = \sqrt{r}sin(\theta)\). See this explanation from Wolfram. These are then multiplied by disc_radius_scaled to scale up to the plotting window.
With the points now defined, they’ll be later colored to give more definition to the night sky and color the galaxy core (bar).
Part 3: Generating spirals
def spirals(A, B, N, rot_fac, fuz_fac, arm):
    """Generate spiral arms for galaxy that follow the barred-galaxy equation of Ringermacher & Mead.

    A = scale/zoom parameter
    B = parameter to control the middle "bulge" or "bar" of the galaxy core
    N = parameter to control how tightly wound the spiral arms are
    rot_fac = angle at which to rotate a spiral arm
    fuzz_fac = parameter to add noise that spiral coordinates
    arm = whether spiral arm is leading (arm=1) or trailing (arm=0)
    """

    ##1##
    spiral_stars = []
    thetas = np.radians(np.arange(0.01, 90, 0.05))
    fuzz = 0.030 * abs(A)

    ##2##
    for theta in thetas:
        try:
            denom = B * math.tan(theta / (2 * N))
            x = (
                A / math.log(denom) * math.cos(theta + math.pi * rot_fac)
                + uniform(-fuzz, fuzz) * fuz_fac
            )
            y = (
                A / math.log(denom) * math.sin(theta + math.pi * rot_fac)
                + uniform(-fuzz, fuzz) * fuz_fac
            )
            spiral_stars.append((x, y))
        except ValueError:
            print(denom)
            print("Cannot take the natural log of 0 or a negative number.  Try again.")

    ##3##
    for x, y in spiral_stars:
        if arm == 0 and math.ceil(x) % 2 == 0:
            c.create_oval(x - 1, y - 1, x + 1, y + 1, fill="#33D4FF", outline="")
        elif arm == 0 and math.ceil(x) % 2 != 0:
            c.create_oval(x - 1, y - 1, x + 1, y + 1, fill="white", outline="")
        elif arm == 1:
            c.create_oval(x, y, x, y, fill="white", outline="")
    return spiral_stars
This is arguably the most important function in the program. spirals gives instructions for how to create spirals according to Ringermacher and Mead’s equation, but it also adds the artistic flair to produce the starry dust within the spiral arms.
Their equation contains a tangent function, and tangent is defined between \((-\frac{\pi}{2}, \frac{\pi}{2})\), but since the equation also contains a natural logarithm, which is not defined for any values \(\leq 0\), we must restrict tangent to values between \(0\) and \(\pi/2\) exclusive.
In ##1## we initialize an empty list which will hold all the star coordinates for the spiral arms. Use a step size of \(0.05\) to get a more dense cluster of stars in the galaxy arm, as we’re confined to angles only in quadrant 1.
We then apply the barred spiral equation in ##2##, defined first in polar coordinates and then converted to rectangular. To create a scattering of stars that are spread out within the spiral, we add some noise using a fuzz factor (fuz_fac) determined by the value of A. Using a rotation factor (rot_fac) allows us to change the angular orientation of a spiral arm as we wish.
Finally, we determine how to plot these coordinates in tkinter in ##3##. The arm parameter determines whether the spiral is a leading (or primary) spiral – this is true if arm = 0. If so, then these stars will appear larger and brighter. Stars here will be blue (hexadecimal code #33D4FF) and white. For arm = 1, the stars in the galaxy spirals will be white but appear more dusty. See Figure 4 for an example.
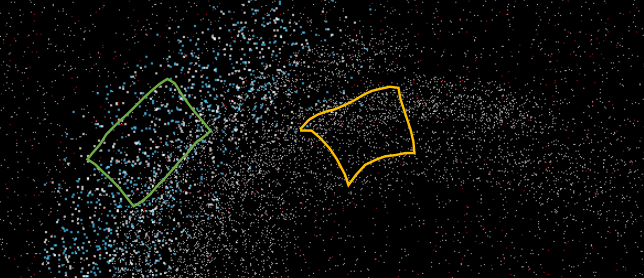
Figure 4: Galaxy stars within different spiral arms, cropped from Figure 1, using arm and rot_fac. The stars in the orange region have arm value of \(1\) and a greater rotation factor (\(0.20\) vs \(0\) for the stars in the green region).
The brighter blue and white dots contained in the green region were made with arm = 0, while the finer white points in the orange region were set with arm = 1. The rotation factor is higher for the points in the orange region to create a wider spread of stars along the fringe of the main spirals for artistic effect.
Part 4: Defining the galaxy core
def ellipse(x, y, theta, a, b):
    """ Polar coordinate form of an ellipse to design galaxy core.

    x = x input
    y = y input
    theta = angle of rotation of ellipse
    a = squared radius of major axis
    b = squared radius of minor axis
    """

    ##1##
    axis_1 = (x * math.cos(theta) - y * math.sin(theta)) ** 2 / a
    axis_2 = (x * math.sin(theta) - y * math.cos(theta)) ** 2 / b
    return axis_1 + axis_2
Due to the log term in Ringermacher & Mead’s equation, there is a discontinuity between opposing spiral arms, which is most pronounced in plot a) in Figure 5.
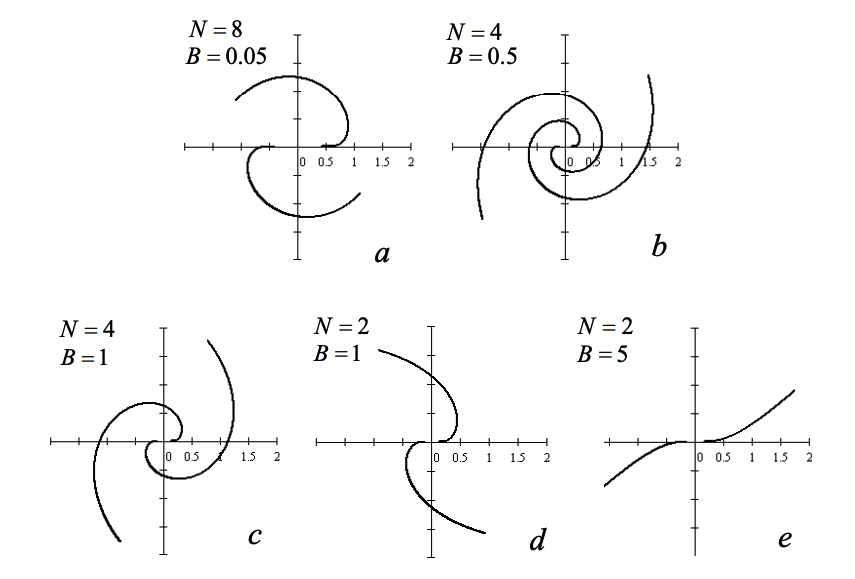
Figure 5: Various realizations of spirals using the equation from Ringermacher and Mead, 2009, and fixed values of A. The discontinuity at \(r = 0\) is present but harder to see in plots b, c, d, and e.
There you can quickly see the break at \(r = 0\). Smaller values of B relative to N tend to obscure the break, but if you zoom in you can see it. We will fill in the galactic gap with an elliptic core.
In ##1##, we simply create a function that generates an ellipse that may be rotated using the theta parameter to match the orientation of the spiral arms. This way we aren’t confined to ellipses whose axes are solely parallel to the x- or y- axes.
Part 5: Creating haze and the galactic core
def star_haze(disc_radius_scaled, density):
    """Randomly distribute faint tkinter stars in galactic disc.

    disc_radius_scaled = radius of galaxy disc.  Larger values will obscure the edges
    density = multiplier to vary number of stars posted
    """

    ##1##
    haze_coords = [
        random_polar_coordinates(disc_radius_scaled)
        for _ in range(disc_radius_scaled * density)
    ]
    ##2##
    for x, y in haze_coords:
        ellipse_haze = ellipse(x, y, -8, 4, 6)
        if np.isclose(ellipse_haze, 300, 10):
            c.create_oval(
                x - 1.5, y - 1.5, x + 1.5, y + 1.5, fill="#F0D3CD", outline=""
            )
        elif x % 2 == 0 and y % 2 == 0:
            c.create_oval(x, y, x, y, fill="red", outline="")
        else:
            c.create_oval(x, y, x, y, fill="white", outline="")
Here we create the stars of the galaxy core and the starry sky surrounding the galaxy. In ##1## we use the random_polar_coordinatesfunction defined earlier to generate coordinates uniformly in a disc. Then in ##2##, check if each pair of \((x,y)\) coordinates falls within the bounds of the ellipse equation
\[\large \frac{(xcos(-8)-ysin(-8))^2}{4} + \frac{(xsin(-8)-ycos(-8))^2}{6} = 300\]
within \(\pm 10\) units, and if so plot these points in a larger shape with color #F0D3CD. The values \(-8\), \(4\), \(6\), \(300\), and \(10\) were chosen after a lot of fiddling around.
Any coordinates with even \(x\) and \(y\) values are colored red for the night sky, and all other points in the sky are white.
Part 6: Implementing in tkinter
def main():
    """ Create the spirals and elliptic core."""
    # clockwise spirals
    spirals(A=650, B=10, N=50, rot_fac=0, fuz_fac=3, arm=0)
    spirals(A=650, B=10, N=50, rot_fac=0.07, fuz_fac=1, arm=1)
    spirals(A=650, B=10, N=50, rot_fac=0.20, fuz_fac=1, arm=1)
    spirals(A=650, B=10, N=50, rot_fac=0.30, fuz_fac=2, arm=1)
    # counterclockwise spirals
    spirals(A=-650, B=10, N=50, rot_fac=0, fuz_fac=3, arm=0)
    spirals(A=-650, B=10, N=50, rot_fac=0.07, fuz_fac=1, arm=1)
    spirals(A=-650, B=10, N=50, rot_fac=0.20, fuz_fac=1, arm=1)
    spirals(A=-650, B=10, N=50, rot_fac=0.30, fuz_fac=2, arm=1)
    # elliptic core
    star_haze(700, 40)
    # don't turn off tk screen unless user clicks close
    root.mainloop()


if __name__ == "__main__":
    main()
Finally, we plot the galaxy in tkinter. We have one main and three secondary arms for both clockwise and counterclockwise spiral arm directions. The parameters A, B, N, and the rotation factor rot_fac were all tweaked around until achieving something resembling a real galaxy.
Wrapping up
This project could have been done in matplotlib, but visual aesthetics are quite easy to acheive in Tkinter. Hopefully this inspires you to create your own art with Python!
Thanks to Lee Vaughan, Harry Ringermacher, and Lawrence Mead for the inspiration.
You can download the full code I wrote here.